
Understanding Express Fundamentals with CRUD, MVC, REST, INDUCES and JSX
Terminal Objectives:
- Understand JSX and jsx-view-engine.
- Set up an Express server.
- Configure Mongoose with MongoDB.
- Create a Mongoose model.
- Build Express routes to handle creating and viewing resources.
Topics Covered:
- JSX and jsx-view-engine.
- Express setup.
- Mongoose configuration.
- Creating a Mongoose model.
- Building Views


Exploring JSX and Component Driven Development
Overview
What is JSX?
JSX is a syntax extension that allows the consolidation of HTML, CSS and JavaScript in the same file, simplifying the process of creating user interfaces. It's widely used in libraries such as React, Lit-HTML, and KofuJS.
Understanding jsx-view-engine
jsx-view-engine is an Express view engine designed to render React components on a server. Its primary purpose is to serve as a substitute for server-side view solutions like jade, ejs or handlebars. It produces static markup and doesn't support client-side view mounting.
Application of JSX
JSX can be employed as a template language, enabling your server to dynamically alter your HTML, which is the focus of this lesson. It's also capable of advanced DOM manipulation, a topic to be covered in subsequent lessons.
Conceptual Representation
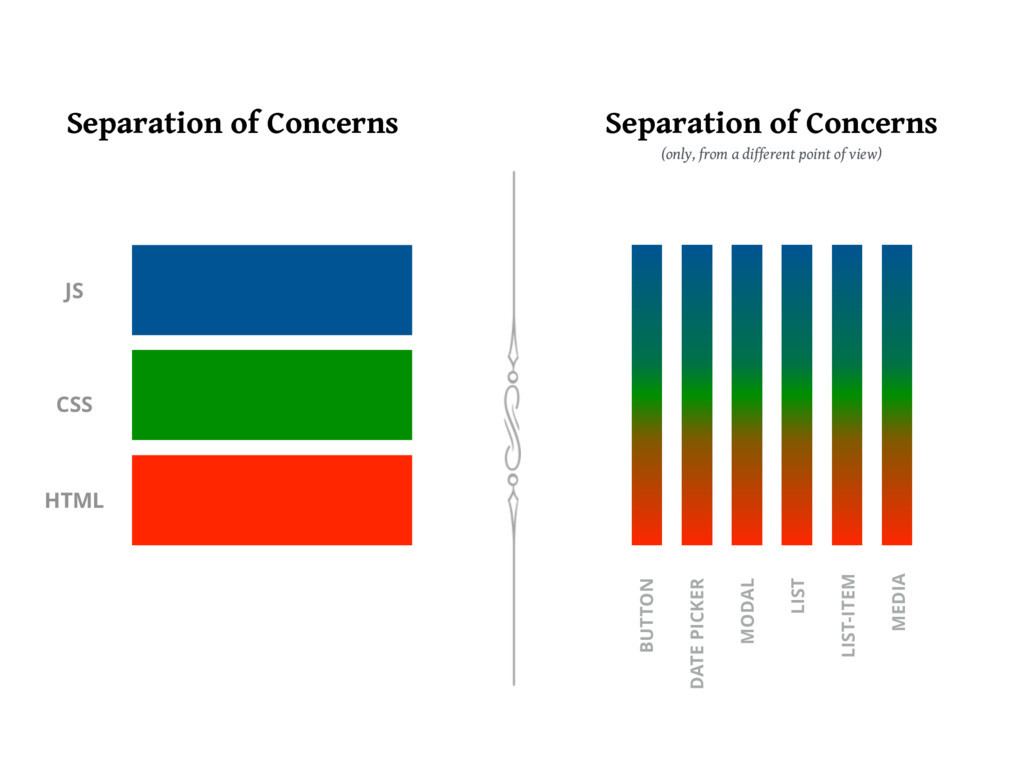
Breaking down tasks into self-sufficient units
We can visualize this concept by imagining a game scenario where there are multiple jobs such as fighting, fishing, and healing. We can form groups focused on each task separately, or create smaller self-sufficient groups with all roles represented. Each approach has its advantages.
Instructional Guide
| URL | HTTP Verb | Action | Used For | Mongoose Method | View |
|---|---|---|---|---|---|
| /fruits/ | GET | index | Displaying a list of all fruits | Fruit.find | Index.jsx |
| /fruits/new | GET | new | Display HTML form for creating a new fruit | none | New.jsx |
| /fruits/:id | DELETE | destroy | Delete a specific photo | Fruit.findByIdAndRemove or Fruit.findByIdAndDelete | none |
| /fruits/:id | PATCH/PUT | update | Update a specific fruit | Fruit.findByIdAndUpdate or Fruit.findOneAndUpdate | none |
| /fruits | POST | create | Create a new fruit | Fruit.create | none |
| /fruits/:id/edit | GET | edit | Return an HTML form for editing a fruit | Fruit.findOne or Fruit.findById | Edit.jsx |
| /fruits/:id | GET | show | Display a specific fruit | Fruit.findOne or Fruit.findById | Show.jsx |
Note: Only GET Requests render a View In RESTful Routing
Setting up the environment
Here are step-by-step instructions to set up the development environment:
- Create a new directory "fruits".
- Initialize a new Node.js project using
npm init -y. - Create necessary directories and files for our MVC architecture.
- Open the project in your code editor.
Steps to start
- Go to your terminal
- Go to a safe folder to work in
mkdir fruitscd fruitstouch server.js .envmkdir models views controllersmkdir views/fruitsnpm init -ycode .
Implementing server.js and configuring Mongoose
The server.js file will be the entry point for our application. We'll use it to set up Express, configure Mongoose to connect to our MongoDB database, and start our server.
Remember to configure .env and .gitignore files properly to secure your database connection string.
Creating the Fruit model
The Fruit model is a Mongoose model which will be used to create fruit documents in our MongoDB database. This model is defined by a schema which specifies the fields that a fruit document can have.
Creating the New Route & Page
Express routes handle the logic for each request to our server. For creating a new fruit, we'll have a GET route that displays a form to the user, and a POST route that handles the form submission.
Building the Create Route
The Create route will handle the logic for creating a new fruit and saving it in our MongoDB database using the Fruit model.
Implementing the Show Route & Page
The Show route and page will handle displaying the details of a single fruit.
Constructing the Index Route & Page
The Index route and page will handle listing all fruits in our database.
Summing Up
By the end of this lesson, you will have gained an understanding of how JSX and the jsx-view-engine work together with Express to create server-rendered views. You will have also learned how to set up a basic Express server, how to configure a MongoDB database with Mongoose, and how to create a Mongoose model. Additionally, you'll be able to create routes for creating and viewing resources. This knowledge will provide a solid foundation for you to explore more advanced topics in server-side JavaScript development.
Lets Do It
Create server.js code
require('dotenv').config()
const express = require('express')
const mongoose = require('mongoose')
const jsxEngine = require('jsx-view-engine')
const Fruit = require('./models/fruit')
const PORT = process.env.PORT || 3000

const app = express()

app.use(express.urlencoded({ extended: true }))// build a ssr website
// app.use(express.json()) //build an api
app.listen(PORT, () =>{
    console.log(`Ayo the Port at ${PORT} is lit`)
})
Add Mongoose Code
require('dotenv').config()
const express = require('express')
const mongoose = require('mongoose')
const jsxEngine = require('jsx-view-engine')
const Fruit = require('./models/fruit')
const PORT = process.env.PORT || 3000

const app = express()

app.use(express.urlencoded({ extended: true }))// build a ssr website
// app.use(express.json()) //build an api
mongoose.connect(process.env.MONGO_URI)
mongoose.connection.once('open', () => {
    console.log('connected to mongodb')
})

app.listen(PORT, () =>{
    console.log(`Ayo the Port at ${PORT} is lit`)
})
Use the Connection String in Your App
- In the terminal in vs code
touch .env .gitignore - then in
.gitignoreadd the following code
node_modules
.env
You can now paste the connection string in the app's .env file, assigning it to a MONGO_URI environment variable:
MONGO_URI=mongodb+srv://sei:<THISISTHEPASSWORD___REMOVE___THE___LessThan_and_GreaterThan>@sei-w0kys.azure.mongodb.net/<THISISTHEDATABASENAME___REMOVE___THE___LessThan_and_GreaterThan>?retryWrites=trueYou're almost done, but you need to update the connection string as follows:
- Replace
<password>with the password of the database user you created earlier. - IMPORTANT The connection string by default connects to a namespace (database) named
test(...mongodb.net/test?retryWrites=true...). However, thetestnamespace must be updated to your preferred namespace (database) name. For example, "movies" (...mongodb.net/movies?retryWrites=true...) or for us now 'fruits' (...mongodb.net/fruits?retryWrites=true...).
Remove the Less Than and Greater Than Signs aka Angle Brackets
< and > must be removed do not put your password or database name in them
You're good to go!
Create The Model
in the models folder make a file called fruit.js and add the following code
const mongoose = require('mongoose')

const fruitSchema = new mongoose.Schema({
    name: { type: String, require: true },
    color: { type: String, require: true },
    readyToEat: Boolean
})

const Fruit = mongoose.model('Fruit', fruitSchema)

module.exports = Fruit
Create the New Route & Page
-
Now, instead of
res.send('some text'), we can callres.render('fruits/New')- express will know to look inside the /views/fruits directory
- it will send the html in the New file as a response
in server.js add this in appropriate location:
// NEW
// show the user a form to fill out to create a fruit
app.get('/fruits/new', (req, res) => {
    res.render('fruits/New')
})
in views/fruits/New.jsx add this:
const React = require('react')

function New (props) {
    return(
        <div>
            <h1>New Fruit Page</h1>
            <a href='/fruits'>Go back to Index Page</a>
            <form action="/fruits" method="POST">
                Name: <input type="text" name="name" /><br/>
                Color: <input type="text" name="color" /><br/>
                Is Ready To Eat: <input type="checkbox" name="readyToEat" /><br/>
                <input type="submit" value="Create Fruit" />
            </form>
        </div>
    )
}

module.exports = New
Test page
- Go to
localhost:3000/fruits/new
It won't work
- add the view engine code
app.set('view engine', 'jsx')
app.engine('jsx', jsxEngine())
Test page
- Go to
localhost:3000/fruits/new
It works
Create the Create Route
// CREATE
// backend only functionality that is used to create a fruit

app.post('/fruits', async (req, res) => {
    if(req.body.readyToEat === 'on'){
        req.body.readyToEat = true
    } else {
        req.body.readyToEat = false
    }
    try{
        const createdFruit = await Fruit.create(req.body)
        res.send(createdFruit)
    }catch(error){
        res.status(400).send({message: error.message})
    }
})
Try to create a fruits from new page now
It should work
Viewing & Editing Data
FYI, you can use the Atlas app to view and edit data by clicking on the BROWSE COLLECTIONS button.
Create the Show Route & Page
in server.js add this to the appropriate location
// SHOW
// shows you 1 individual fruit
app.get('/fruits/:id', async (req, res) => {
    try {
        const foundFruit = await Fruit.findOne({_id: req.params.id})
        res.render('fruits/Show', {
            fruit: foundFruit
        })
    } catch (error) {
        res.status(400).send({ message: error.message })
    }
})
in views/fruits/Show.jsx add this:
const React = require('react')

function Show(props){
    return(
        <div>
            <h1>{props.fruit.name}</h1>
            <a href='/fruits'>Go back to Index Page</a>
            <p>
                The {props.fruit.name} is {props.fruit.color} and
                {props.fruit.readyToEat? 'It is ready to eat': 'It is not ready to eat'}
            </p>
        </div>
    )
}

module.exports = Show
Update Create Route to Use The Show Route
// CREATE
// backend only functionality that is used to create a fruit

app.post('/fruits', async (req, res) => {
    if(req.body.readyToEat === 'on'){
        req.body.readyToEat = true
    } else {
        req.body.readyToEat = false
    }
    try{
        const createdFruit = await Fruit.create(req.body)
        res.redirect(`/fruits/${createdFruit._id}`)
    }catch(error){
        res.status(400).send({message: error.message})
    }
})
Create a fruit from the New Page again
Now you should redirect to an HTML Page
Create the Index Route & Page
in server.js add this in the appropriate location
const React = require('react')

function Index (props) {
    return (
        <div>
            <h1>Fruits Index Page</h1>
            <a href="/fruits/new">Create A new Fruit Here</a>
            <ul>
                {
                    props.fruits.map((fruit) => {
                        return (
                            <li key={fruit._id}>
                                <a href={`/fruits/${fruit._id}`}>{fruit.name}</a> is {fruit.color}
                            </li>
                        )
                    })
                }
            </ul>
        </div>
    )
}

module.exports = Index
in views/fruits/Index.jsx add this:
const React = require('react')

function Index (props) {
    return (
        <div>
            <h1>Fruits Index Page</h1>
            <a href="/fruits/new">Create A new Fruit Here</a>
            <ul>
                {
                    props.fruits.map((fruit) => {
                        return (
                            <li key={fruit._id}>
                                <a href={`/fruits/${fruit._id}`}>{fruit.name}</a> is {fruit.color}
                            </li>
                        )
                    })
                }
            </ul>
        </div>
    )
}

module.exports = Index
Check out the Index Page
You should see all fruits you made
Full server.js once done
require('dotenv').config()
const express = require('express')
const mongoose = require('mongoose')
const jsxEngine = require('jsx-view-engine')
const Fruit = require('./models/fruit')
const PORT = process.env.PORT || 3000

const app = express()

app.use(express.urlencoded({ extended: true }))// build a ssr website
// app.use(express.json()) //build an api
app.set('view engine', 'jsx')
app.engine('jsx', jsxEngine())

mongoose.connect(process.env.MONGO_URI)
mongoose.connection.once('open', () => {
    console.log('connected to mongodb')
})

// INDUCES

// INDEX
// list all fruits
app.get('/fruits', async (req, res) => {
    try {
        const foundFruits = await Fruit.find({})
        res.render('fruits/Index', {
            fruits: foundFruits
        })
    } catch (error) {
        res.status(400).send({ message: error.message })
    }
})

// NEW
// show the user a form to fill out to create a fruit
app.get('/fruits/new', (req, res) => {
    res.render('fruits/New')
})
// DELETE
// backend only functionality that is used to delete a fruit

// UPDATE
// backend only functionality that is used to update a fruit

// CREATE
// backend only functionality that is used to create a fruit

app.post('/fruits', async (req, res) => {
    if(req.body.readyToEat === 'on'){
        req.body.readyToEat = true
    } else {
        req.body.readyToEat = false
    }
    try{
        const createdFruit = await Fruit.create(req.body)
        res.redirect(`/fruits/${createdFruit._id}`)
    }catch(error){
        res.status(400).send({message: error.message})
    }
})

// EDIT
// show you a form that lets you edit the fruit

// SHOW
// shows you 1 individual fruit
app.get('/fruits/:id', async (req, res) => {
    try {
        const foundFruit = await Fruit.findOne({_id: req.params.id})
        res.render('fruits/Show', {
            fruit: foundFruit
        })
    } catch (error) {
        res.status(400).send({ message: error.message })
    }
})

app.listen(PORT, () =>{
    console.log(`Ayo the Port at ${PORT} is lit`)
})
Connections, Schema, Models, Document and Collections
- The Connection connects your Node.js Server to MongoDB
- Schema ensures the structure of your data that you put into the database
- Models is the class that implements the schema and gives us javascript methods we can use to interact with MongoDb Database, it automatically makes a Collection in the DB, comprised of Documents that pass the Schema.
- Document is an Instance of the Model and is represented by one Object In a collection
- Collection is a group of documents of the same Model
Where Does It Fit in With MVC
| URL | HTTP Verb | Action | Used For | Mongoose Method | View |
|---|---|---|---|---|---|
| /fruits/ | GET | index | Displaying a list of all fruits | Fruit.find | Index.jsx |
| /fruits/new | GET | new | Display HTML form for creating a new fruit | none | New.jsx |
| /fruits/:id | DELETE | destroy | Delete a specific photo | Fruit.findByIdAndRemove or Fruit.findByIdAndDelete | none |
| /fruits/:id | PATCH/PUT | update | Update a specific fruit | Fruit.findByIdAndUpdate or Fruit.findOneAndUpdate | none |
| /fruits | POST | create | Create a new fruit | Fruit.create | none |
| /fruits/:id/edit | GET | edit | Return an HTML form for editing a fruit | Fruit.findOne or Fruit.findById | Edit.jsx |
| /fruits/:id | GET | show | Display a specific fruit | Fruit.findOne or Fruit.findById | Show.jsx |
Note: Only GET Requests render a View In RESTful Routing
Understanding Structure
| Connections | Schema | Models | Document | Collection | Database | Cluster |
|---|---|---|---|---|---|---|
| In server.js, or connection file Connect to DB using Connection URL | In model file identify the structure of your data | Use the schema to create a new Model that can connect to DB with JavaScript methods like .find, create and .findOneAndUpdate |
An instance of the Model that passes the schema, residing in a collection | The group of documents that were added to the database by a specific Model | A collection of all your collections, every app should have it's own Database | All your databases in your Atlas Account live in your cluster, you only need one cluster and all your databases go in the cluster |
For people that know SQL
- Collection ====> Table
- Document ====> Row
- Key on Schema =====> Column